Homework 1: The IDLE Development Environment & Go To Line
Due date: Friday, 01/16/2026 11:59 PM
Foreword
One of the primary objectives of this course is for students to develop the ability to read documentations effectively. Therefore, in guiding you through the setup of your development environment for IDLE, we will not in this document be providing detailed step-by-step instructions, as you may customarily have found in previous classes. File paths and commands may be slightly off and need to be edited, and/or there may be commands you need to run that are not listed in the writeup. We hope that you will be able to use documentation and other resources allowed by this course to fill in the gaps!
Process Journal
As part of this homework assignment, you are required to maintain a Process Journal documenting your experience while completing this assignment. The purpose of the Process Journal is to mainly document your thought process, challenges you faced, and how you overcame them. The instructions for your Process Journal and a sample process journal can be found here.
Part 1: The IDLE Development Environment
Summary
The source code for IDLE is located within the official CPython repository, which is the reference implementation of the Python programming language. Since we would like to avoid working directly on our operating system’s installation of Python1, we will create our own working copy of Python as the foundation of our development environment.
This guide was created with the author’s experience from creating a development environment on the following setup:
- Ubuntu 22.04 LTS
- gcc 11.3.0
- Visual Studio Code
- git 2.34.1
For the most part, we will be referring to Python’s own Developer’s Guide. We will highlight several most relevant sections of the official documentation, as well as the order in which you should follow them. This document assumes reasonable familiarity with Python, git, and the command line interface in a UNIX-bassed environment such as Linux or MacOS.
IMPORTANT:
If you have a Windows machine, it is required that you install Windows Subsystem for Linux (WSL 2) so you can work in a UNIX- based environment. The staff members will not be able to provide support for students working in a native Windows environment.
Downloading the Codebase
The first step is to download the source code for CPython onto your machine for local development.
Here, instead of following the official Python developer’s guide, we have created our own master copy of the CPython code base, which we will distribute through GitHub Classroom.
Accept the GitHub Classroom Assignment here: GitHub Classroom Invitation
Once you accept the GitHub Classroom assignment, you should have your own repository containing the CPython source code.
You will then need to use git to clone the repository to your own machine.
If you do not have git installed: follow this guide.
Note: Do NOT follow the “Get the source code” section of the official Python Developer’s Guide! Use our own GitHub Classroom repository instead.
Building Your Own Python
Before compiling our Python interpreter from the source code, we will need to install some additional OS dependencies for certain modules to work properly. The most important one we need is the tkinter package2. To install them on your system, follow this section of the official guide:
Now that the necessary dependencies have been installed, we can go ahead and build our working copy of Python. Follow this section of the official guide:
For now, you can stick to the default configuration flags recommended by the guide.
Note that since we have already installed all the necessary dependencies, you should not see the list of extension modules that have not been built as mentioned in the guide. Instead, you should see something like:
Note: Deepfreeze may have added some global objects,
      so run 'make regen-global-objects' if necessary.
Checked 111 modules (30 built-in, 80 shared, 1 n/a on linux-x86_64, 0 disabled, 0 missing,
0 failed on import)
Once you have the “working build” as mentioned in the documentation, you should run it to check that you have indeed successfully built Python with the extension modules. For example, to check for the tkinter module, run the compiled Python interpreter in the terminal, and try–
$ ./python
Python 3.14.0a6+ (heads/main:2cdc518, ...) [GCC 11.3.0] on linux
Type "help", "copyright", "credits" or "license" for more information.
>>> import tkinter
>>>
If all went well, you should be able to successfully import the tkinter module without any exceptions thrown.
Running IDLE
Once all that is set up, you can now run IDLE with your own Python that is separate from the OS version. Navigate to the CPython repository where your python executable is, and start IDLE from the terminal like so:
Reminder: File paths and commands may be slightly off and need to be edited, and/or there may be commands you need to run that are not listed in the writeup.
In the case below, what is your CPython repository named? (Hint: What did you clone from Github Classroom? It should look something like homework-[username]...).
$ cd ~/CPython  # go to the CPython repo
$ ./python -m idlelib
You should now see the IDLE program starting as it normally would.
Note: If you are running python -m idlelib (without the ./), chances are that you are running a version of python different than the one you built from source. Make sure you are running the version local in the repository!
Setting Up Your Editor
For this course, follow this guide to set up Visual Studio Code as your primary editor.
Visual Studio Code (VSCode) has in recent years become one of the most popular code editors in the industry.
One of the many reasons for its enormous popularity is its extensive support for a wide range of programming languages through extensions. For Python development, the Python extension is highly recommended and is almost a necessity for working with large code bases3.
Once you have VSCode and the Python extension installed on your machine, you can navigate to the directory where you cloned the CPython repository, and open the directory containing the source code for IDLE: CPython/Lib/idlelib.
The first thing you should do is setting the Python interpreter for your workspace. You should set the Python executable you just compiled in the CPython repository as the interpreter. (Use the “Enter interpreter path…” option here, since our own copy of Python likely won’t show up as one of the defaults, which include your system’s global Python installations.)
Once the interpreter is set, you should see the change reflected in the status bar at the bottom of the VSCode window. The Python version displayed there should be the same as if you ran ./python --version with your own Python executable in the CPython directory, something like:
$ ./python --version
Python 3.14.0
Part 2: Go To Line
Now that you have your own copy of IDLE running, you can start making changes to the source code!
Motivation
Our marketing team has just conducted extensive user testing of developers that use IDLE. One of the main issues identified by our team involved the Go To Line feature found under Edit when the Python Editor Window is open.
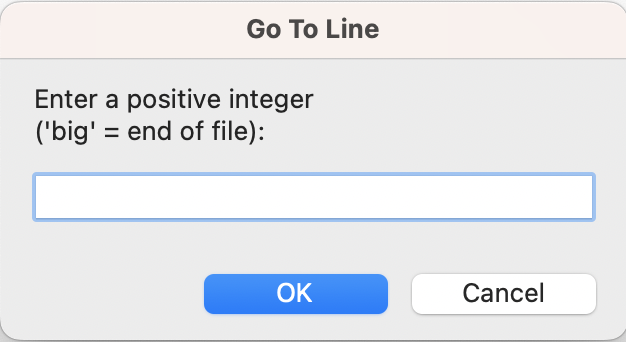
Users reported being confused about what big meant (whether it meant they should type in the word big or type in a big number). We would like you to update the Go To Line popup to fix this issue.
Our competitors, such as VS Code, have an effective implementation of such a feature. When the user sees the popup for Go To Line, the maximum allowed input (i.e., the number of lines within a file) is shown to the users.

Task
Specifically, edit the Go To Line popup (in the editor, not shell) to fulfill these requirements:
Required Features
You must implement the following features to receive full credit for this assignment.
- Show the user their current line number when the
Go To Linepopup is displayed. See the image of the VSCode feature to see an example. - If the user enters a value that is too large (bigger than the total number of lines), a red error message should be shown to users that says
Enter a number between 1 and N, inclusivewhereNis the number of lines in the file. The error message should display in the Go to Line popup as red text. - Implement the logic for handling a negative number using reverse indexing. For example, -1 should go to the last line, -2 should be the second to last line, etc. If a user enters a number that is too negative such that it extends past the first line, the error message shown to users should say
Negative entries must be between -N and -1, inclusivewhereNis the number of lines in the file. The error message should display in the Go to Line popup as red text. - Change the
Go To Linepopup such that the popup should show the user the range of values allowed (i.e., show the total number of lines). You can choose the exact wording, but it should mention that a user can enter a number between 1 and N or -N and -1.
Optional Features
Completing the following optional features will have no impact on your final homework grade, but we encourage you to try them out!
- (OPTIONAL) Allow entries for the
Go To Linepopup to be formatted likeX:YwhereXis the line number andYis the column (character) number within that line. - (OPTIONAL) Create some other custom enhancement to the feature that you think can help us stand out from our competitors! It can be a visual enhancement, an additional input that is accepted, etc.
Submission
Please create a branch for your homework submission named homework1. Then, create a pull request from that branch to the main branch. DO NOT MERGE THE BRANCH! In that new branch, please create a folder called Homework1 inside the idlelib codebase. Within this folder, you will add your Process Journal as a markdown or PDF file. The instructions for your Process Journal can be found here. Make a pull request for the final submission, but do not merge it. For the pull request, please follow the template provided here.
Note: You should definitely show your process in the process journal for part 1 - it’s very common to run into issues with set up! Even if the process ran smoothly, it would be good to include some screenshots.
-
Python is an interpreted language, and many different versions of the Python interpreter may exist simultaneously in one system. Your operating system, particularly MacOS or Linux, likely comes with both a Python 2 and Python 3 interpreter installed. ↩
-
The tkinter package (“Tk interface”) is the standard Python interface to the Tcl/Tk GUI toolkit. Both Tk and tkinter are available on most Unix platforms, including macOS, as well as on Windows systems. ↩
-
Hey, that’s the name of this class! ↩