Homework 4
Due Date: Friday, February 6th, 2026 @ 11:59PM
Part 1: Setup Testing in VS Code
Running tests from the terminal is standard, but configuring VS Code’s Testing Explorer allows you to run specific tests with a single click and visually track your progress.
Configure the Testing Framework
1. Install Dependencies
Before configuring the editor, you must ensure pytest is installed in your environment. Run the following commands in your terminal:
$ ./python -m ensurepip --upgrade
$ ./python -m pip install pytest
2. Configure the Testing Framework
To enable the Testing Icon (the beaker) in your sidebar, you must point VS Code to the idlelib test suite.
Note on Directory Selection: When using the VS Code UI to “Configure Python Tests,” you may only be able to select the Lib folder. To ensure the explorer only focuses on the relevant IDLE tests, you must manually modify your .vscode/settings.json file to point to the idlelib/idle_test path.
Ensure your .vscode/settings.json looks exactly like this:
{
    "python.testing.pytestArgs": [
        "Lib/idlelib/idle_test"
    ],
    "python.testing.unittestEnabled": false,
    "python.testing.pytestEnabled": true
}
3. Discover and Run idlelib Tests
Once the settings are saved, VS Code will scan the repository. This may take a moment given the size of the codebase.
Locate the Testing Icon on the left-hand activity bar.
Find the idle_test folder within the hierarchy in the Testing tab.
Click the Play Button at the top of the Test Explorer to run all discovered tests.
Verify that your status bar turns green and the test tree populates with results.
Submission Requirement
As part of your Part 1 Submission in your process journal:
Capture a Screenshot: Take a clear screenshot of your VS Code window showing the Test Explorer with the idle_test results visible.
What we want to see: We are looking for the “Green Checkmarks” indicating that the idlelib suite has successfully run on your local machine.
Part 2: Understanding Expand Word in IDLE Using Test Case Comprehension
Motivation
Contributing to a mature codebase often involves navigating features without prior context or documentation. In such environments, reverse-engineering the intended logic through existing unit tests is a critical skill. By analyzing established test suites, developers can uncover expected behaviors and edge cases, providing a reliable foundation for both feature comprehension and subsequent manual verification.
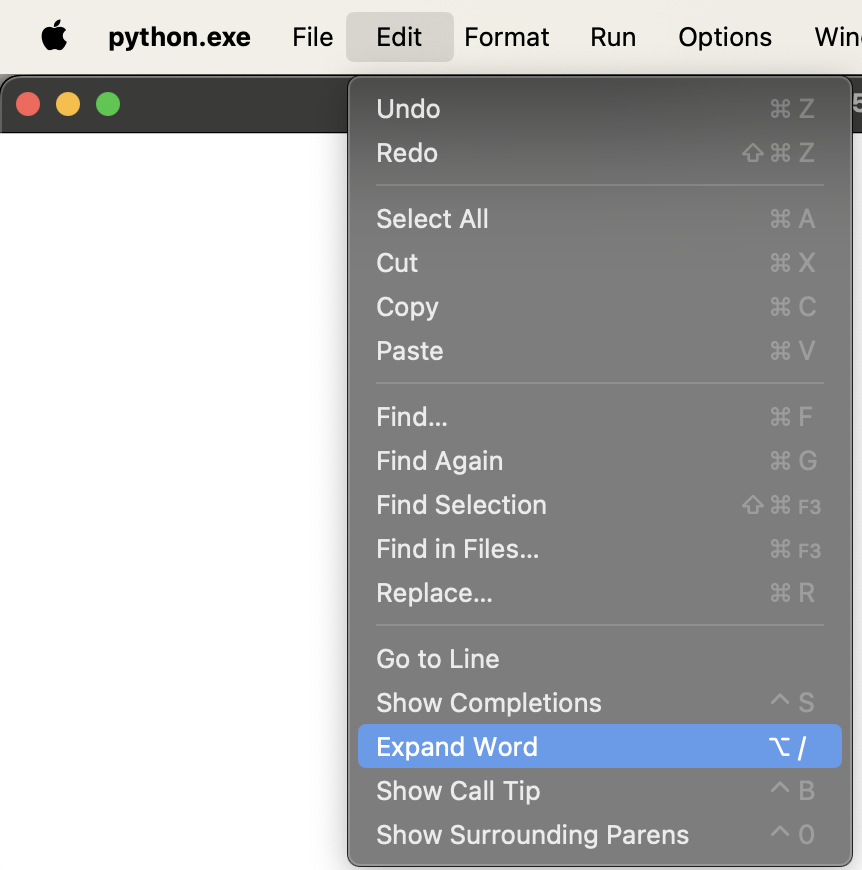
We will be looking at an often overlooked feature in the IDLE editor: Edit -> Expand Word. To use it, place your cursor at the end of a word, then press the Edit -> Expand Word option in the edit menu.
What is “Expand Word”?
In modern editors like VS Code, we are used to Auto-Complete, which suggests words based on the Python language itself (like print or list).
Expand Word is different. It doesn’t auto-complete based on the Python language keywords; it looks at what you have already typed in your current file. It is a way to quickly finish a long variable name or string without re-typing it.
Task: Understanding Expand Word Through Unit Tests
In your process journal, create a new section called “Part 2 Submission.”
Your objective is to describe the expected behavior of the Edit -> Expand Word feature using only the unit test (Lib/idlelib/idle_test/test_autoexpand.py) as your guide.
Your primary task is to reverse-engineer the “Mental Model” of the Edit -> Expand Word feature. You will document your findings in a report within your process journal. The goal is to clearly articulate how the feature is expected to behave in various scenarios, as defined by the unit tests. Some guiding questions to help structure your analysis are provided below.
Guiding Questions
Search Origin & Direction: Where does the search begin (e.g., top of file, end of file, or relative to the cursor)? In what direction(s) does the engine look first?
Word Definition: How is a “word” defined by the engine? How does it handle symbols like brackets [], colons :, or quotes ""?
Duplicate Handling: What happens if the same matching word appears multiple times in the file?
Failure & Cycling: What happens when there are no matches left or no matches at all?
State Persistence: What specific actions cause the engine to “reset” its state and start the search over?
Reporting Requirements
For each of the behaviors above (and other behaviours you may have found), your journal must include:
Logical Deduction: Your answer to the question based on the unit tests.
Test Evidence: The name of the specific test case(s) that prove this behavior.
Manual Testing Proof (Screenshot): A screenshot of the IDLE editor showing:
- The text you typed to test the scenario.
- An explanation of where your cursor was placed.
- A description of what happened when you invoked the feature (e.g., “The word expanded to X,” or “The system bell rang”).
Note: The AutoExpand class is different from AutoComplete. Ensure you are using the correct feature (Edit -> Expand Word or Alt + /) during your manual testing.
Part 3: Go to Definition
Note: There is no new GitHub classroom assignment for this project. Please use the same repository as we have been using for previous projects.
Please do your work for Homework 4 in a new branch that you create (do not use the feedback branch or other existing branches).
Motivation
The goal of this assignment is to add a new feature to IDLE that allows users to Go to Definition of the method that the user’s cursor is on. This feature is an extremely useful way for programmers to understand what exactly a method does while reading some code that uses the feature.
Task
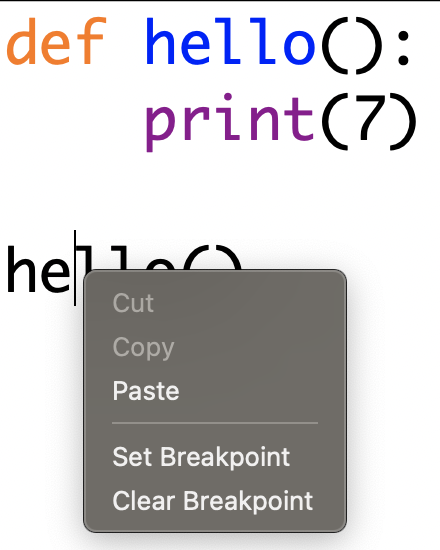
Your specific task will be to add a menu item to the set of options that appear in the context menu. A screenshot of what the context menu looks like is below. The context menu can be usually be brought up when a user does a <Control + Click> event (when a user holds down the Control button and clicks), but it may depend per operating system. This menu can also be invoked by clicking with two fingers on a Mac system or a right-click on a Windows system. If clicking with two fingers does not work for you on Mac, using only <Control + Click> to bring up the menu is fine. See the image below for an example of the menu.
Please implement this feature as an IDLE extension (like ZzDummy).
When a user selects this option while on a method name, the cursor should then go to the definition of that method. If the cursor is not on a method implementation or the method does not appear in the current Python file, then it should ring the Tkinter bell to indicate that we cannot go to the definition of that method. There are other features in IDLE that also ring this bell for certain events.
For now, our feature only needs to handle method names. Do not worry about classes, variables, or any other objects. Other aspects of the design of the features (including the code organization of your added code) are left up to you. In addition, the Go to Definition feature only needs to be able to navigate to the function definition if it is within the current editor window that is open.
When the shell window is active, please either grey out the menu option to make it unselectable, or hide it from the menu.
Clarifications:
- 02/06/2026:
- It is required that Go to Definition goes to the line of the function name. It is not required to also go to the exact column / move the cursor to the start of the function definition
- You can assume our feature only needs to work for valid Python files with good code styling.
- On Windows, the menu can be brought up through using
right clickinstead ofcontrol click. - You do not need to change the keybinding for what brings up the context menu.
Submission
Please submit this by 11:59PM on Friday, February 6th, 2026. Use the pull request template and make sure to include screenshots of your new feature in action.
For part 3 only, also submit a UML diagram in your process journal that can be used to understand your new feature.
Video
In addition to the Pull Request, please make a video that is no longer than 1 minute (it can certainly be shorter).
NEW: We will be grading based on how comprehensive the edge case testing is. You should at least show the following:
- Show that the code runs, the menu option is there
- Show the Go To Definition feature working (you should show a couple different situations)
- Show
Go To Definitionused through CTRL-CLICK - Show
Go To Definitionused while in the editor, and that it cannot be used in the shell - Show
Go To Definitionwhen the cursor is on a method name - Show
Go To Definitionwhen the cursor is NOT on a method name - Other edge cases as relevant (and may be revealed closer to the deadline)…
The video is best done on a private Zoom room, where you share your screen and record the meeting. Then, you can download the video and upload it (to either Google Drive or Youtube), and include the link to the video in your pull request description. Please make sure to have the correct permissions on your video so that the course staff will be able to view it.
Documentation (Process Journal):
Project Folder: Create a folder named “Homework 4”. Please use the instructions for the Process Journal to create that file for your submission.
Submission Checklist: https://docs.google.com/document/d/11on33qbZkkelfUefdRsaJ4fiNoqSSt-OQg-QlKC-Vco/edit?usp=sharing